Ford ZX2 cylinder head replacement
Last Updated on March 12, 2024 by Mutiara
The following is a brief list of steps required for the replacement or swapping of the cylinder heads on a Ford ZX2 with the 2.0 L Zetec engine, produced from 1998-2003.
- Relieve the fuel pressure.
- Remove fuel pump fuse.
- Start the engine and run it until it stalls.
- Crank the engine 2 more times to relieve fuel pressure.
- Turn off the ignition and replace the fuel pump fuse.
- Disconnect the battery ground cable.
- Remove the intake.
- Disconnect all the vacuum hoses from the intake.
- Remove the bracket.
- Loosen the clamp and remove the intake pipe from throttle body.
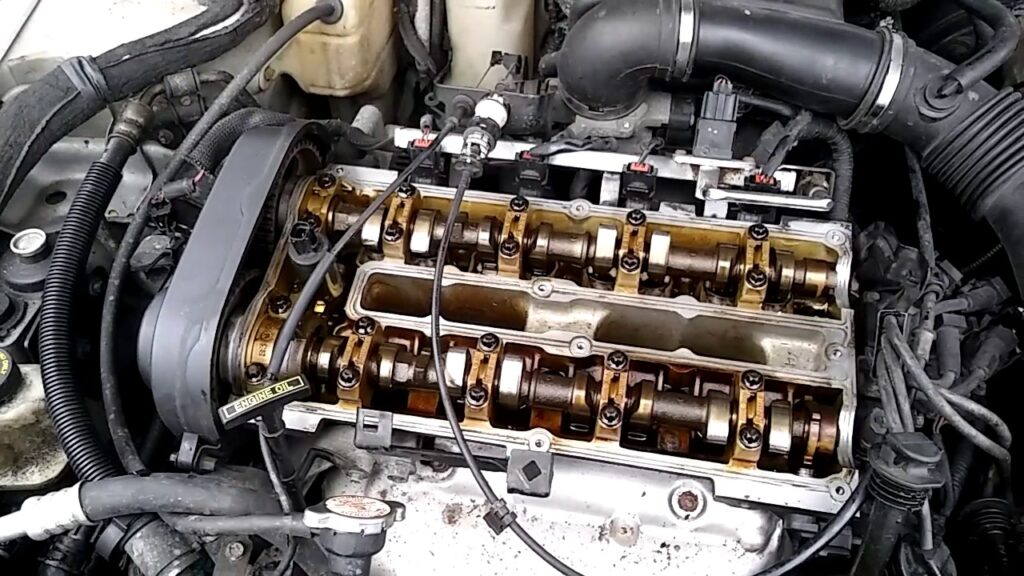
- Remove the camshafts
- Remove throttle and cruise control cables, and set them aside.
- Unplug the VCT connector.
- Remove the spark plug cover.
- Unplug and remove the ignition wires. Be sure to never pull by the cable, only pull by the boot. Pulling by the cable can easily rip it out and damage the spark plug wires!
- Remove the front support isolator damper.
- Remove the top timing cover.
- Remove the valve cover.
- Raise the passenger side front and place support beneath it.
- Remove the passenger side front wheel.
- Remove the splash shield.
- Rotate the crankshaft to TDC.
- Insert camshaft alignment tool.
- Loosen the water pump bolts.
- Remove the drive belt.
- Remove the water pump pulley.
- Remove the drive belt pulley or UDP.
- Remove lower timing belt cover.
- Loosen the timing tensioner pulley bolt.
- Disconnect the tensioner tab from the timing cover backplate.
- Slide the timing belt off.
- Hold the intake cam with a wrench and remove the cam gear bolt and gear.
- Hold the exhaust cam with a wrench, and remove the VCT oil plug, bolt, and gear.
- Remove the VCT bolts.
- Rotate the VCT solenoid 90 degrees.
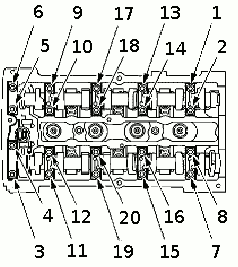
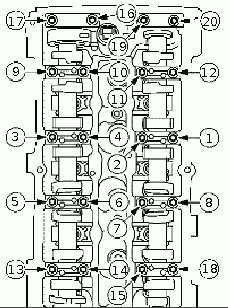
- Remove journal caps in several two turn passes as shown:
- Remove the thermostat housing.
- Drain coolant.
- Disconnect the temperature sensor connector.
- Disconnect the camshaft position sensor connector.
- Disconnect the ignition coil plug connector.
- Disconnect the upper radiator hose from the thermostat housing.
- Remove the thermostat housing.
- Remove the coolant recovery reservoir.
- Remove the radiator overflow hose.
- Disconnect the low coolant sensor.
- Remove the bolts and nuts securing the coolant reservoir, and then remove the coolant reservoir.
- Disconnect the fuel line.
- Remove the fuel line clip.
- Install the fuel line disconnect tool.
- Separate the fitting.
- Remove the tool.
- Remove the power steering pump and bracket.
- Remove 4 pump bracket bolts.
- Move pump and bracket aside.
- Remove exhaust manifold / header.
- Remove the Alternator.
- Disconnect the 2 electrical connectors.
- Remove 3 generator bolts.
- Remove the battery power nut and washer.
- Disconnect the battery positive cable and remove the generator.
- Remove the cylinder head.
- Remove the upper bolts from the generator bracket.
- Disconnect all the vacuum hoses.
- Disconnect the main engine electrical harness connectors.
- Remove the bolts and cylinder head.
- Prepare the cylinder head for installation.
- Install a coil pack on the new head.
- Install a camshaft position sensor on the new head.
- Install the idle air sensor on the intake manifold.
- Install the wiring harness on the intake manifold.
- Install the intake manifold on the new head.
- install the timing cover backplate.
- Grind engine dowels 1/4 in.
- Install engine dowels in engine block.
- Clean the pistons and block surface.
- Install new head studs (finger tight).
- Install the cylinder head.
- Install a new head gasket.
- Put the cylinder head back on the block.
- Apply molly grease to the head studs.
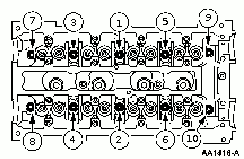
- Install head nuts (60 ft-lbs) in order shown:
- Connect the camshaft position sensor connector.
- Connect the main engine electrical connectors.
- Connect the vacuum lines.
- Install the upper alternator bracket bolts.
- Install the alternator.
- (Optional) Install an alternator ODP.
- Attach the battery positive cable to the alternator.
- Install the battery power washer and nut.
- Install the alternator and 3 bolts (29-40 ft-lbs).
- Connect 2 electrical connectors.
- Install the exhaust manifold / header.
- Install new manifold studs. The old ones may snap upon reinstallation from the stress involved from heat expansion throughout their service.
- Install a new manifold gasket.
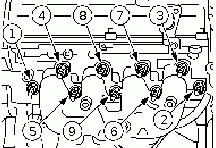
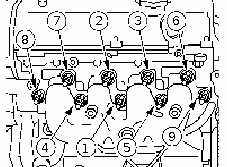
- Install the exhaust manifold / headers and tighten the nuts in the sequence shown below (10-12 ft-lbs):
- Install 3 bolts on the header downpipe.
- Install the oil level indicator tube.
- Install the cooling fan.
- Connect the cooling fan connector.
- Install the power steering pump and bracket.
- Install the bracket, secured by 4 bolts (20-30 ft-lbs).
- Connect the fuel line.
- (Optional) Replace the fuel filter (remove clips and put a new one in).
- Inspect and clean both of the fuel line ends.
- Lubricate the o-rings on the fuel line ends with oil.
- Snap the couplings back together, then verify the connection by pulling them apart.
- Install the fuel line clip.
- Install the coolant recovery reservoir.
- Install the bolts and nuts.
- Connect the low coolant sensor.
- Install the radiator overflow hose.
- Install the thermostat housing.
- Install the housing with 4 bolts (8-12 ft-lbs).
- Connect the coolant hoses.
- Connect the ignition coil.
- Connect the water temperature sensors.
- Install the camshafts.
- Install the valve lash caps on each valve and lube each bucket in oil.
- Put molly grease on each journal.
- Install the cams and apply oil to the camshaft bearing surfaces.
- Apply a thin coat of silicone gasket and sealant to the front camshaft bearing cap.
- Install the camshaft journal caps.
- Install the bolts and tighten in several 2-turn passes in the sequence shown below (10-12 ft-lbs):
- Install the VCT bolts (88 in-lbs).
- Rotate the camshafts one full turn and inspect for binding.
- Install the cam gears.
- Install the VCT adapter o-ring onto the exhaust camshaft.
- Slide the VCT adapter over the camshaft.
- Slide the cam gear over the adapter and install the washer and bolt (finger tight).
- Slide the intake cam gear onto the intake camshaft and install the bolt (finger tight).
- Install the timing belt.
- Install a new timing tensioner pulley.
- Install a new timing idler pulley.
- Slide the new timing belt cover over the cam gears and pulleys.
- Engage the timing tensioner tab into the upper timing cover backplate.
- Using a 6 mm allen wrench, adjust the timing marks until aligned.
- Tighten the bolt on the intake cam gear (50 ft-lbs).
- Tighten the bolt on the exhaust cam gear (50 ft-lbs).
- Rotate the crankshaft 2 full turns, check cam alignment.
- Install the middle timing cover with the idler pulley.
- Install the lower timing cover.
- Install the drive belt pulley or UDP.
- Install the water pump pulle.
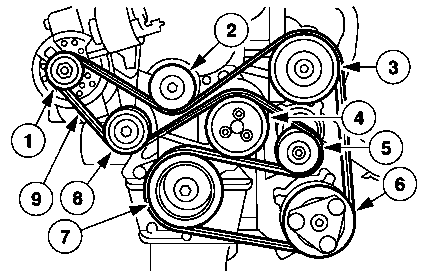
- Install the drive belt. More information along is available in the ZX2 belt replacement article.
- Tighten the water pump pulley bolts.
- Install the splash shield.
- install the passenger wheel.
- Install a new oil filter.
- Install the drain plug.
- lower the vehicle.
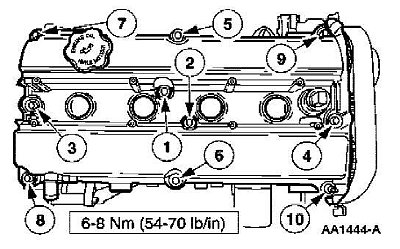
- Install the valve cover (54-70 in-lbs).
- Install the spark plugs and wires.
- Install spark plug cover (earlier models).
- Connect the VCT connector.
- Connect the throttle and cruise control cables.
- Finalizing.
- Install the intake and tighten the clamps.
- Connect the battery ground cable.
- Fill the oil.
- Fill the coolant.
- Start the vehicle.
