Windshield replacement
Last Updated on May 8, 2024 by Mutiara
A missing windshield is a rare sight in an auto salvage yard, because most people think it is too difficult to achieve. However, the task is rather simple to do in less than a few hours with the help of a friend or by yourself. Typically when someone damages their windshield the replacement cost can start from 170 and go as high as 250 dollars.
However most junkyards only charge 35-50 for a windshield. The most difficult part is removing one carefully, without creating any cracks or damage to the glass. Some auto salvage yards may also charge for any broken windshields during the removal process, as this can usually take a few to get it right. With the curvature of the glass and tension from the adhesive, it will usually take someone 2-5 times to get one out without damage when attempting this for the first time without any prior experience.
If the junkard will penalize you for this, avoid going to them ever again as they don’t deserve any business. 99% of the cars will never have their windshields removed and end up going to the crusher anyways!
| Required tools & supplies |
|---|
|
Removal procedure
- The first thing you want to do when getting to an auto salvage yard is go over all of your options. Sometimes you will find vehicles with replaced windshields, although they will be slightly poorer in quality as far as the tint and fade at the top goes, they will be far easier to remove because the factory installed windshields are always done with the most amount of adhesive, and the adhesive is older and harder to cut. Also pay attention to barely visible scratches on the surface when picking your windshield. Some vehicles will have more than others from things such as debris being stuck in windshield wipers and scratching the windshield during use.
- Once you’ve located the vehicle you’d like to obtain your windshield from, locate the most convenient point of access, with the thickest amount of adhesive. You want the thickest area to avoid touching the glass with any tools, which frequently ends up cracking it.
- Remove the plastic trim, headliner, or anything that is in the way.
- Peel back the trim on the outside of the windshield, that resides between the windshield and the rest of the outer body surface. This will have to be done carefully with a flat head screwdriver or a razor blade, without making any contact with the glass. Doing so can crack and ruin it.
- In some rare cases the trim may have a metal form to attach to the windshield. This can sometimes make the following procedure very tedious or impossible by blocking a route for the cable to go through and making removal of the trim nearly impossible without breaking the windshield.
- Obtain a thin steel cable of some sort. The best source is usually a throttle cable, or cables from lawn mowers or motorcycles since they usually tend to be thinner. Buying one should be the last resort, since the junkyard is full of them. Use the wire snips to cut the cable, it should be 2 feet in length or more. You may have heard of people mentioning using piano wire for removing windshields. Nothing could be more foolish than locating and spending money on specialized wire, when the entire junkyard is full of endless amounts of it for free.
- You will have to penetrate the adhesive, which is usually in a rubbery state, with some tool. This can either be done with carefully hammering a razor blade in, using a sharp knife, or sometimes even with a flat head screwdriver.

Steel cable from a throttle body.
- Once you’ve reached the outside with the screw driver, razor blade, or a knife, retract it and begin to push the steel cable into the recently created cut. Sometimes pushing the end is not possible, and you will have to push a loop through the cut to be able to apply enough pressure. Check the outside until the cable can be seen coming out from beneath the windshield.
- If you’re unable to carefully penetrate the adhesive layer to send through the cable, there is a safer alternative although it requires a longer cable. If your cable is long enough to wrap around the whole windshield, then you may run it along the entire side opposite of you and begin sawing through the entire side without having to go inside the vehicle.
- Grab the cable and pull it through until half of it is outside.
- Either wrap both ends of the steel cable (outside & inside) around a screw driver or something similar, or have your assistant do it with his end. It is possible to move both of them at once by yourself, however it is much easier to have a friend pull one one from one side and then to pull it back each time, kind of like a sawing action.
- Begin to saw through the adhesive.
- Always try to keep the smallest angle to the edge of the window on both sides, to increase the speed of the cut.
- Always keep the cable extremely tight, for fast results. The tighter the cable during the sawing action, the faster it will cut.
- Try to keep the smallest angle to the glass surface itself during the process. The bigger the angle away from the glass the higher the chance that it may get caught on a piece of metal during the process and begin to cut that, while degrading the cable, instead of cutting through the adhesive.
- On most vehicles anyone should be able to go through at least a few inches every minute. If the progress halts in one area and no adhesive is being cut, chances are the cable has become stuck on a piece of metal or something else, and is cutting that instead of cutting the adhesive.
- When going around corners, have the person on the outside take the corner ahead of time and bend the steel cable around it, this will speed up the process.
- Once the adhesive has been cut all the way around, and only then, attempt to carefully lift the window out of place. If any adhesive is left in tact, it can put pressure on the windshield and crack it during the removal process.

The windshield should be inspected to make sure no cracks, no matter how small, developed around the edges during removal. Otherwise this entire procedure will have to be repeated later on when the crack grows after installation, or even breaks the windshield entirely during transport.
Installation procedure
- Remove the windshield on the designated vehicle the same way it was removed in the junkyard.
- To speed this up, professional windshield installers usually use an automatic chisel to get it off quickly, however this can result in lots of small glass shards inside the vehicle if not done right.
- Use a razor blade to evenly remove the adhesive on the new windshield, and the car body itself. In some cases paint may come off with the adhesive, this is fine as it will be covered up with the new windshield adhesive anyways.

3M Window Weld
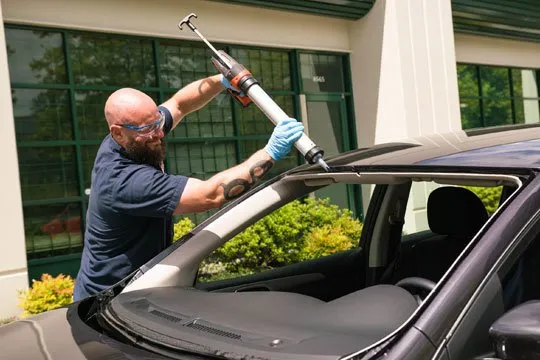
- Open the rear end of the windshield adhesive such as 3M’s Window Weld, and load it in a caulking gun.
- Spread an even bead around the window seat on the body.
- If for some reason there is not enough or achieving a consistent spread is not possible, concentrate a lot on the sides, and the top. This is crucial for keeping out rain water. However there still has to be an adequate amount all around, as it is what holds the windshield and spreads out the energy from the pressure of oncoming air. If the window is not held evenly all around, a chance of cracking is very high.
- If you are unsure of how thick the bead should be in order to use the tube up evenly, run a small bead several times around until you run out. Typically one tube will last for one windshield installation.
- Pick up the window, and carefully place it on to it’s final resting place, make sure it is placed down properly right from the start, to avoid having to move it around.
- Do not wait too long to do this step as most windshield adhesives are very fast drying, allowing only a small time frame for the actual installation.
- Once the windshield has been installed, inspect (and wipe off if necessary) the adhesive all around and how well it has spread with the pressure of the windshield on it.
- Avoid using the vehicle for an hour or two after installation. During this stage the adhesive is still hardening and bonding to the windshield. Since the chassis of a vehicle flexes while being driven and turning, this can upset the seal and ruin the whole installation. Although some installations have been done with less than 30 minutes of wait time prior to being driven without any bad results.

The 1.6 L 3 cylinder turbocharged EcoBoost engine is an upcoming design in a number of Ford vehicles wearing the Read more
Common Ford power steering issues Ford power steering pump with reservoir. The power steering system commonly found on most Ford Read more
The Ford MTX-75 (Manual TransaXle), is a 5-speed transmission developed by Ford Motor Company for its larger engined front wheel drive models. "75" refers to Read more
This page contains some modifications that were done to a Ford Windstar with a 3.8 Ford Essex engine for amusement. Read more